Bilt-eezi
Bilt-eezi building sheets are
produced as single sheets, printed in colour on thin card. The original designs
were based on real buildings, capturing the essential qualities of those
buildings with detailed drawing and colouring techniques.
If assembled directly from the printed sheets, the average modeller can, in a very short time, produce an attractive model that will add depth to their model layout as background buildings.
With just a little more time, effort, and imagination, a rather flat model can be transformed into a highly detailed fine-scale model to rival kit products costing many times more.
And the more experienced modeller, drawing on their experience of modelling and detailing techniques, will find Bilteezi sheets can provide an excellent source of components for the construction of exquisite models that will compare favourably with scratch-built items
Tips, hints & ideas
(A) Making the most of what is supplied on the sheet.
Perhaps the most frequently heard "drawback" to modelling with Bilt-eezi sheets is that they are flat, lacking relief detail. This is partly true, they are flat, but if one looks, the detail is there, in the carefully executed artwork - shadows, weathering and features. Without going as far as the arguments about what the real depth of relief detail should be once scaled down to our modelling proportions, it does not take too much lateral thinking to see what can be done to introduce "real" depth . . .
Windows - all types, are only very rarely set absolutely flush with the outside surface of a wall, and even when they are, there will be some sort of relief detail around them - sills below, weather strips above. The printed window frames are finely detailed and coloured, and will look greatly enhanced if they are cut out from the surrounding wall, and re-fixed slightly recessed. Depending on the type of building and type of window, the amount of recess may, of course, vary greatly - after cutting out the window from the wall, add backing layer(s) behind the wall to give it strength and depth; mount the window onto a further piece of thin card, slightly larger than the aperture, then re-fix the window into the deepened opening.
Doors - as with windows, these look much better recessed a little within their door surround. For panelled doors, cutting out the recess panels and placing a base layer behind the front card, will usually look very effective.
Brickwork - the quality of the artwork on Bilteezi sheets is generally sufficient that embossing brickwork courses is unnecessary, but if you feel like it, mortar courses can be scribed - carefully to avoid breaking the surface of the card. Always work with a ruler and in good light, attacking small areas at a time to avoid going completely insane! Any wall recesses or surface features can be cut and overlaid to good effect - in some cases this is best done by working with two (or more) copies of the same sheet. Other surface features, such as window-sills, door-steps and lintels, can also be treated in this way.
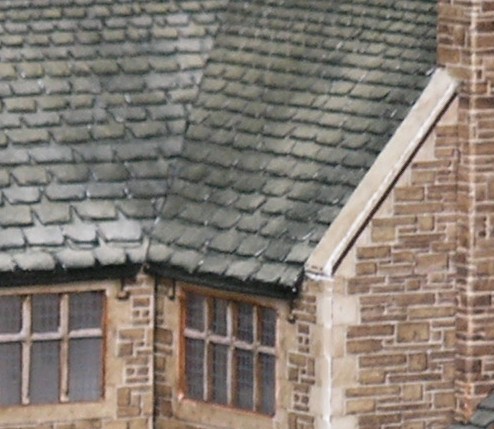
Roofs - the majority of model buildings are normally viewed from above, so it is their roofs that are most prominently on display. It is therefore worth spending a little extra time making the roof look as realistic as possible. The Stonesfield slate roofs depicted on the stone buildings in the series lend themselves particularly to the treatment of strip-laying ... using two copies of the printed sheet, cover the backs with double sided adhesive tape, then cut the stone slates into strips 2 courses wide. Starting from the bottom edge of the roof, lay these strips over a third copy of the roof (a photocopy is perfectly sufficient for this), each strip overlapping the one below it by one course. Remember to cut carefully along the uneven lower edge of visible courses, and colour exposed edges before fixing. Beware that on this type of roof, the slate courses become narrower as they reach the top of the roof, at which point the process becomes annoyingly intricate! Ordinary tiled roofs can be treated in a similar fashion, but it may be found that the card on which the sheets are printed may be a little thick and look over scale. An alternative is simply (!) to scribe along the printed tile course lines to break up the flatness of the roof.
'Stonesfield slate' roof laid as overlapping strips; 'leaded' glazings placed behind printed outer frames; gutter strips cut and shaped from spare card.
Chimneys - Chimney stacks make a very tempting place to grab hold of models when handling them. We have nothing against that, but please make sure that the chimney stack is up to the job! Even if they are not being used for handling, chimney stacks simply stuck onto the roof do not usually look right. We recommend making a core of solid wood strip, packed out with layers of card as necessary to match the inside dimensions of the printed facings, then stick the printed facing around the core. Make the core long enough to extend through a hole cut into the roof, and down far enough to anchor securely to the inside of the model. Care must be taken when cutting the hole to take the stack, but any slight discrepancy will be covered by the outer brick-work layers which can still finish flush with the roof.
Strength and substance - The card on which these kits are printed is quite thin - deliberately so to make for easier cutting and folding - and some strengthening is needed to make the finished model look right. Walls can be reinforced with additional layers of card (we do not recommend the use of plastic sheet as the different materials tend to warp). For most purposes, card of approx 0.5mm thickness is quite sufficient (e.g. cereal packet card is quite suitable). Rather than fixing the whole kit sheet to backing card before cutting out, we recommend that each building section is cut out, and corners scored reading for folding to shape, then each wall is lined with a separate piece of strengthening card - otherwise it is much more difficult to achieve clean crisp corners on the model. When making strengthening layers, some thought and planning is necessary to make sure that recesses for doors and windows are allowed for - cut out features before adding backing layers, and re-cut through the backing layer(s) if necessary afterwards.
Additional rigidity is possible by cutting floors and roof linings from card approx 1mm thick (e.g. picture mounting board), and using these to assemble the complete building around.
(B) Adding detail to the model
To glaze or not to glaze? Very much a matter of personal taste, but for buildings that are close to view, it can be quite noticeable. Of course, on the other hand, the closer it can be seen, the easier it may be to see how well, or badly, the building interior has been modelled ... you pays your money, and you takes your choice! If you decide to replace the printed card windows with acetates, you have the choice to use ready-printed, or etched brass, items from various manufacturers that may be available as accessories - not necessarily identical replacements, but something that looks suitable for the type of building - or you may choose to take the more fiddly option of retaining the printed glazing bars from the sheet - cutting out the black panes carefully - then fix the window frames to pieces of clear acetate material instead of card before re-fitting from the back of the window aperture.
Gutters and down-pipes - one of the most frequently asked questions. There are moulded plastic items available for 'OO' (Ratio) that can be used for this purpose to good effect, but we generally find that it is not necessary to go to that extent. Card of a similar thickness to that on which Bilteezi kits are printed on (something thinner is best for 'N') is suitable for making very acceptable gutter strips. Use a narrow strip, part of which should be shaped into a slight 'cup'-profile by colouring with felt-tipped pen, then, while the card is still slightly wet and pliable, use a fine point to press it into a suitable groove, such as that frequently found on the back surface of plastic or metal rulers. The flat part of the strip is then fixed under the edge of the roof so that the tile edge is in line with the centre of the 'cup' shape. The guttering thus formed is quite delicate, but more accurately to scale than moulded versions. For down-pipes, plastic coated florists wire is very suitable, and is available in various thicknesses which allow for different types of building. This product is easily shaped, and accepts paint and glue easily. Pipework brackets / joints can be represented with narrow strips of self-adhesive label material wrapped around the wire and coloured to match. Door handles, hinges etc. - creating very fine details can be satisfying - door handles made from very small pins, or blobs of glue allowed to set on the end of a piece of cotton thread, then fixing them though small holes in the doors, slivers of plastic for window latches and hinges, the possibilities are endless. However ... think about what you are doing and who you are doing it for - can it actually be seen, and was it worth the visit from the men in white coats who want to take you for a "restful holiday"!
(C) Freelance buildings from multiple kits.
One of the great plus-points of Bilteezi designs is the way the building parts are presented on the kit sheets - in particular that, as far as possible, there is little distinction between parts that are printed together so that the modeller is not tied to scoring / folding in particular places. This allows very simple re-definition of the dimensions of the model. Folds can be made in different positions, reversed to form building wings and recesses, or parts may be used in a different order, or additional parts added from other kits .. the same or different ones. A certain amount of planning is recommended before taking this approach, especially when the finished building dimensions have been altered which may necessitate complex reconstruction of roof sections. Once we embark upon this sort of modelling, a world of possibilities is open to us. We can only advise that simpler projects be tackled before getting too ambitious.
If assembled directly from the printed sheets, the average modeller can, in a very short time, produce an attractive model that will add depth to their model layout as background buildings.
With just a little more time, effort, and imagination, a rather flat model can be transformed into a highly detailed fine-scale model to rival kit products costing many times more.
And the more experienced modeller, drawing on their experience of modelling and detailing techniques, will find Bilteezi sheets can provide an excellent source of components for the construction of exquisite models that will compare favourably with scratch-built items
Tips, hints & ideas
(A) Making the most of what is supplied on the sheet.
Perhaps the most frequently heard "drawback" to modelling with Bilt-eezi sheets is that they are flat, lacking relief detail. This is partly true, they are flat, but if one looks, the detail is there, in the carefully executed artwork - shadows, weathering and features. Without going as far as the arguments about what the real depth of relief detail should be once scaled down to our modelling proportions, it does not take too much lateral thinking to see what can be done to introduce "real" depth . . .
Windows - all types, are only very rarely set absolutely flush with the outside surface of a wall, and even when they are, there will be some sort of relief detail around them - sills below, weather strips above. The printed window frames are finely detailed and coloured, and will look greatly enhanced if they are cut out from the surrounding wall, and re-fixed slightly recessed. Depending on the type of building and type of window, the amount of recess may, of course, vary greatly - after cutting out the window from the wall, add backing layer(s) behind the wall to give it strength and depth; mount the window onto a further piece of thin card, slightly larger than the aperture, then re-fix the window into the deepened opening.
Doors - as with windows, these look much better recessed a little within their door surround. For panelled doors, cutting out the recess panels and placing a base layer behind the front card, will usually look very effective.
Brickwork - the quality of the artwork on Bilteezi sheets is generally sufficient that embossing brickwork courses is unnecessary, but if you feel like it, mortar courses can be scribed - carefully to avoid breaking the surface of the card. Always work with a ruler and in good light, attacking small areas at a time to avoid going completely insane! Any wall recesses or surface features can be cut and overlaid to good effect - in some cases this is best done by working with two (or more) copies of the same sheet. Other surface features, such as window-sills, door-steps and lintels, can also be treated in this way.
Roofs - the majority of model buildings are normally viewed from above, so it is their roofs that are most prominently on display. It is therefore worth spending a little extra time making the roof look as realistic as possible. The Stonesfield slate roofs depicted on the stone buildings in the series lend themselves particularly to the treatment of strip-laying ... using two copies of the printed sheet, cover the backs with double sided adhesive tape, then cut the stone slates into strips 2 courses wide. Starting from the bottom edge of the roof, lay these strips over a third copy of the roof (a photocopy is perfectly sufficient for this), each strip overlapping the one below it by one course. Remember to cut carefully along the uneven lower edge of visible courses, and colour exposed edges before fixing. Beware that on this type of roof, the slate courses become narrower as they reach the top of the roof, at which point the process becomes annoyingly intricate! Ordinary tiled roofs can be treated in a similar fashion, but it may be found that the card on which the sheets are printed may be a little thick and look over scale. An alternative is simply (!) to scribe along the printed tile course lines to break up the flatness of the roof.
'Stonesfield slate' roof laid as overlapping strips; 'leaded' glazings placed behind printed outer frames; gutter strips cut and shaped from spare card.
Chimneys - Chimney stacks make a very tempting place to grab hold of models when handling them. We have nothing against that, but please make sure that the chimney stack is up to the job! Even if they are not being used for handling, chimney stacks simply stuck onto the roof do not usually look right. We recommend making a core of solid wood strip, packed out with layers of card as necessary to match the inside dimensions of the printed facings, then stick the printed facing around the core. Make the core long enough to extend through a hole cut into the roof, and down far enough to anchor securely to the inside of the model. Care must be taken when cutting the hole to take the stack, but any slight discrepancy will be covered by the outer brick-work layers which can still finish flush with the roof.
Strength and substance - The card on which these kits are printed is quite thin - deliberately so to make for easier cutting and folding - and some strengthening is needed to make the finished model look right. Walls can be reinforced with additional layers of card (we do not recommend the use of plastic sheet as the different materials tend to warp). For most purposes, card of approx 0.5mm thickness is quite sufficient (e.g. cereal packet card is quite suitable). Rather than fixing the whole kit sheet to backing card before cutting out, we recommend that each building section is cut out, and corners scored reading for folding to shape, then each wall is lined with a separate piece of strengthening card - otherwise it is much more difficult to achieve clean crisp corners on the model. When making strengthening layers, some thought and planning is necessary to make sure that recesses for doors and windows are allowed for - cut out features before adding backing layers, and re-cut through the backing layer(s) if necessary afterwards.
Additional rigidity is possible by cutting floors and roof linings from card approx 1mm thick (e.g. picture mounting board), and using these to assemble the complete building around.
(B) Adding detail to the model
To glaze or not to glaze? Very much a matter of personal taste, but for buildings that are close to view, it can be quite noticeable. Of course, on the other hand, the closer it can be seen, the easier it may be to see how well, or badly, the building interior has been modelled ... you pays your money, and you takes your choice! If you decide to replace the printed card windows with acetates, you have the choice to use ready-printed, or etched brass, items from various manufacturers that may be available as accessories - not necessarily identical replacements, but something that looks suitable for the type of building - or you may choose to take the more fiddly option of retaining the printed glazing bars from the sheet - cutting out the black panes carefully - then fix the window frames to pieces of clear acetate material instead of card before re-fitting from the back of the window aperture.
Gutters and down-pipes - one of the most frequently asked questions. There are moulded plastic items available for 'OO' (Ratio) that can be used for this purpose to good effect, but we generally find that it is not necessary to go to that extent. Card of a similar thickness to that on which Bilteezi kits are printed on (something thinner is best for 'N') is suitable for making very acceptable gutter strips. Use a narrow strip, part of which should be shaped into a slight 'cup'-profile by colouring with felt-tipped pen, then, while the card is still slightly wet and pliable, use a fine point to press it into a suitable groove, such as that frequently found on the back surface of plastic or metal rulers. The flat part of the strip is then fixed under the edge of the roof so that the tile edge is in line with the centre of the 'cup' shape. The guttering thus formed is quite delicate, but more accurately to scale than moulded versions. For down-pipes, plastic coated florists wire is very suitable, and is available in various thicknesses which allow for different types of building. This product is easily shaped, and accepts paint and glue easily. Pipework brackets / joints can be represented with narrow strips of self-adhesive label material wrapped around the wire and coloured to match. Door handles, hinges etc. - creating very fine details can be satisfying - door handles made from very small pins, or blobs of glue allowed to set on the end of a piece of cotton thread, then fixing them though small holes in the doors, slivers of plastic for window latches and hinges, the possibilities are endless. However ... think about what you are doing and who you are doing it for - can it actually be seen, and was it worth the visit from the men in white coats who want to take you for a "restful holiday"!
(C) Freelance buildings from multiple kits.
One of the great plus-points of Bilteezi designs is the way the building parts are presented on the kit sheets - in particular that, as far as possible, there is little distinction between parts that are printed together so that the modeller is not tied to scoring / folding in particular places. This allows very simple re-definition of the dimensions of the model. Folds can be made in different positions, reversed to form building wings and recesses, or parts may be used in a different order, or additional parts added from other kits .. the same or different ones. A certain amount of planning is recommended before taking this approach, especially when the finished building dimensions have been altered which may necessitate complex reconstruction of roof sections. Once we embark upon this sort of modelling, a world of possibilities is open to us. We can only advise that simpler projects be tackled before getting too ambitious.
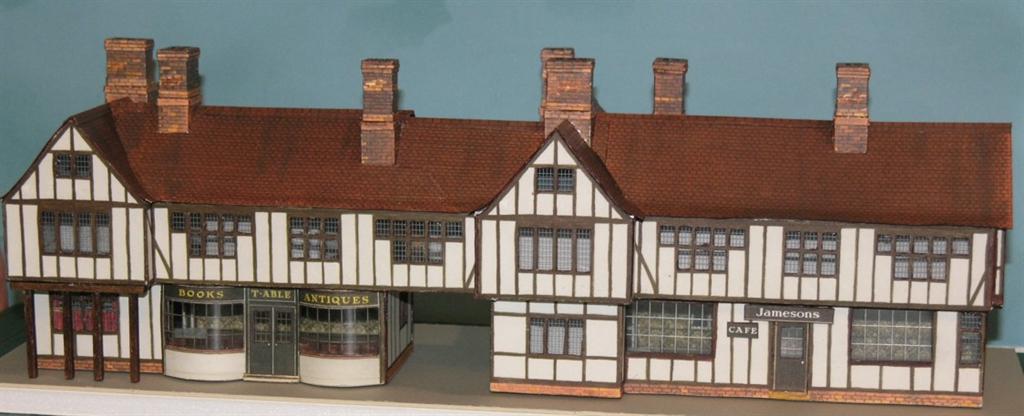
"Shop in Style!" Based on 2 copies of kit D5, plus parts from additional sheets, glazing by Scene-Setters, and a bucket-load of imagination.
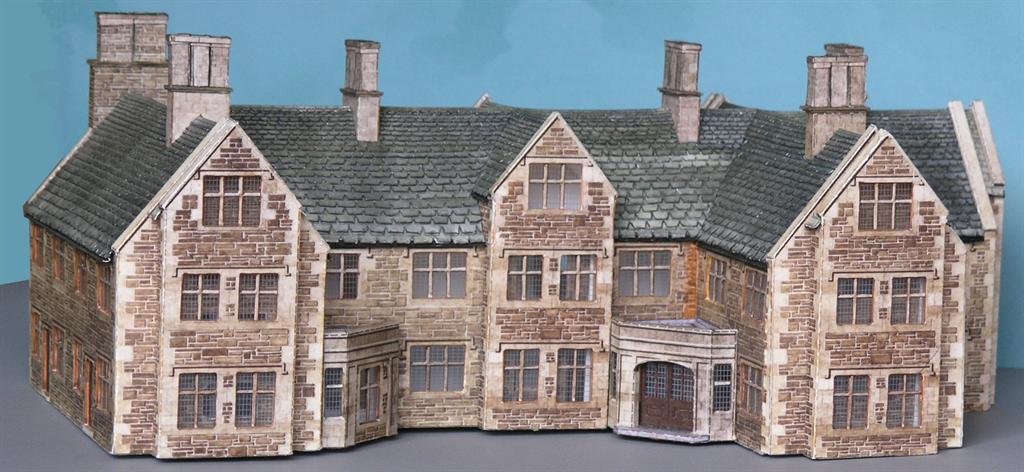
"The Manor" Based on 3 copies of kit F4, glazing by Scene-Setters
This page is reproduced with the kind permission of Freestone Model Accessories.©
